
Cracked floor tiles are one of those problems you notice the moment you step into a room. They’re unsightly, can spread, and often signal deeper issues under the surface. Whether you’re troubleshooting a few hairline fractures or a cluster of shattered tiles, understanding why cracks form is the first step to fixing them the right way.
Most tile cracking stems from movement or moisture in the substrate, improper installation or material choice, environmental stress, or mechanical overload, address those root causes and you’ll prevent the majority of failures.
This article walks you through the common crack types, structural and installation causes, inspection methods, repair options, and practical prevention steps so you can make confident, cost-effective decisions for your floors.
Types Of Tile Cracks And What They Mean
Hairline, Surface, And Partial Cracks
Hairline cracks are thin, surface-level fractures often confined to the glaze or the tile’s top layer. You’ll spot them as fine lines that may not go all the way through the tile. They’re often cosmetic but can widen if underlying movement continues. Clean the area and monitor: if the line darkens or widens, investigate the substrate.
Surface and partial cracks sometimes originate from impacts, manufacturing flaws, or glazing stress. If you press near a partial crack and feel any give, it suggests poor bonding beneath the tile. In many cases a surface filler or epoxy will mask the issue short term, but long-term repair usually requires replacing the tile and correcting the cause.
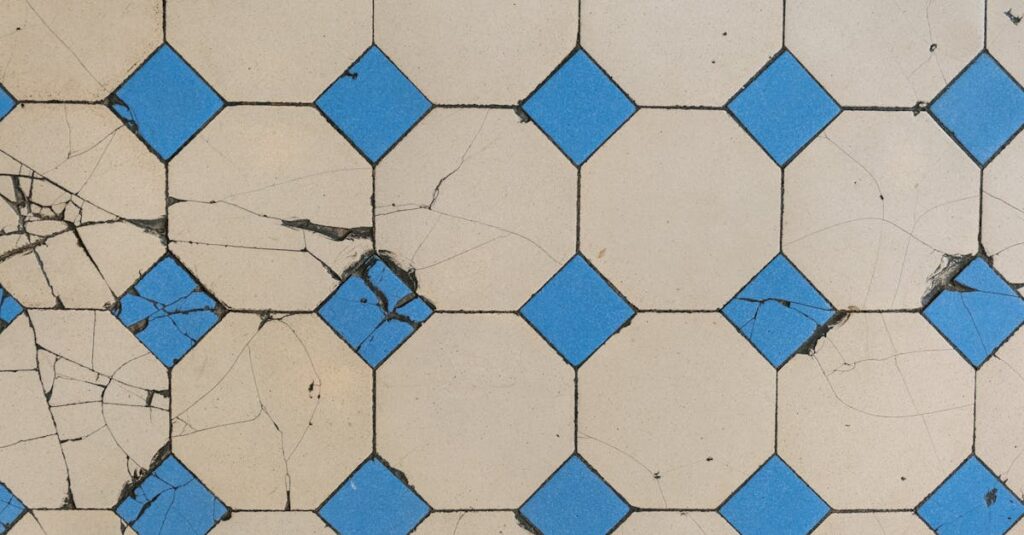
If you see multiple hairline cracks in a pattern, that can indicate substrate movement or thermal stress rather than random impacts. Photograph and map these cracks before attempting repairs: mapping helps you detect spreading or new lines.
When you evaluate hairline or partial cracks, check grout joints and surrounding tiles. Stiff or broken grout next to a hairline crack often points to a localized stress concentration rather than a single isolated defect.
Through Cracks And Shattered Tiles
Through cracks go completely through the tile body and usually indicate more severe problems. A snapped tile under foot or a fractured edge after a heavy impact are common scenarios. Shattered tiles, where a tile breaks into many pieces, are typically caused by a significant point load, a manufacturing defect in low-strength tile, or unsupported substrate.
A through crack that runs in a straight line often follows an underlying crack in the substrate or a cold joint in concrete. Shattered tiles clustered in one area almost always demand substrate investigation: you’ll need to test for deflection, voids, or slab movement.
When you find through cracks, temporarily block the area from traffic to avoid injury. Document the pattern and severity: if multiple tiles are affected, plan a systematic removal and substrate inspection rather than piecemeal fixes.
Repairing through cracks almost always means removing and replacing the tile. But replacing without addressing the root cause often leads to recurrence, so pair tile replacement with substrate or installation corrections.
Crazing, Spiderweb Cracks, And Glaze Failures
Crazing looks like a network of very fine, shallow cracks in the glaze layer and is usually cosmetic. It can result from differential shrinkage during firing, thermal shock, or incompatible glaze/clay combinations. Spiderweb patterns often don’t affect tile strength but can trap dirt and grow more visible over time.
Glaze failures include crazing, crazing that penetrates, or delamination where the glazed surface flakes off. In wet areas, repeated freeze–thaw or chemical attack can worsen glaze issues. Evaluate whether glaze damage is purely aesthetic or a sign of deeper tile degradation before deciding between cosmetic treatment and replacement.
If glaze crazing appears shortly after installation, consider returning tiles to the supplier for inspection: you may have a manufacturing batch problem. For older installations, crazing without other signs of movement is often acceptable, although owners may choose replacement for appearance.
Clean and seal crazed tiles to reduce staining, but recognize sealing is a cosmetic bandage, it won’t stop structural cracking originating under the tile.
Structural vs. Cosmetic Cracking
Not all cracks are equally urgent. Cosmetic cracking affects only the surface appearance: structural cracking indicates load, movement, or substrate failure that could progress. You can often live with cosmetic crazing or hairline glaze lines, but structural cracks, through cracks, tiles popping, or patterns following slab joints, need prompt action.
Ask yourself three questions: Is the crack through the tile? Is the surrounding grout or tile plane displaced? Does the crack change when loads or temperatures vary? If the answer is yes to any, treat it as structural.
Map cracks and test whether they grow over days or weeks. Active structural cracks will often widen or propagate, while cosmetic ones remain stable.
Documenting crack type and behavior will guide whether you pursue cosmetic repair, tile replacement, or a full substrate remediation.
Structural And Substrate Causes
Concrete Slab Movement And Settlement
Concrete slabs move. They shrink as they cure, expand and contract with temperature and moisture changes, and can settle if the fill beneath wasn’t compacted properly. These movements create stresses that travel into the tile system and can cause cracking, especially along control or cold joints.
Settlement over voids or poorly compacted soil often produces localized cracking patterns, clusters or linear breaks where the slab spans an unsupported void. If you suspect settlement, look for other signs such as cracks in nearby walls or differential slab heights.
Control and expansion joints in the slab must line up with tile movement joints. When they don’t, the tile system resists natural slab movement and transfers stress into the tiles. A mismatch between slab joints and tile joints is a common cause of repeated cracking.
If slab movement is suspected, bring in a concrete or structural specialist. Remediation can range from injecting grout into voids to cutting and filling joints or, in severe cases, slab underpinning.
Subfloor Deflection And Joist Issues (Wood Floors)
Wood subfloors behave very differently from concrete. They flex under load, and that deflection is a primary cause of tile failure on wood. Tile demands a rigid platform: even small, repeated flexing will crack rigid ceramic or porcelain tiles.
Common problems include insufficient joist spacing, deteriorated joists, or inadequate subfloor thickness. In new construction, follow the tile industry rule of stiffness (L/360 or better) to minimize deflection under live loads. In older homes, rot or insect damage can reduce stiffness unexpectedly.
If you’re tiling over wood, use an appropriate cement backer board or an uncoupling membrane and ensure joists meet load and spacing standards. Failing to do so often guarantees premature cracking and debonding.
A structural carpenter or flooring specialist can measure deflection and recommend reinforcement, sistering joists, or converting to a concrete topping where appropriate.
Inadequate Backer Board Or Underlayment
Backer boards and underlayments bridge gaps, distribute loads, and provide a suitable surface for tile bonding. If the underlayment is too thin, improperly fastened, or incompatible with the tile and adhesive, the bond will fail and tiles will crack or pop.
Common mistakes include using drywall or particleboard under tile, insufficient fastener pattern, or choosing a backer that swells with moisture. Modern cementitious backer boards or fiber-cement underlayments reduce these risks but must be installed per manufacturer instructions.
Uncoupling membranes (like those from reputable manufacturers) can mitigate minor movement between substrate and tile. But they’re not a substitute for proper structural support, they absorb differential movement, not severe deflection.
Always follow the Tile Council of North America guidelines and manufacturer instructions when selecting and installing backer materials. The TCNA Handbook is a useful reference for proper substrate assemblies (https://www.tcnatile.com/).
Improper Movement Joints And Lack Of Expansion Gaps
Tile assemblies need movement joints to accommodate thermal and structural movement. Skipping expansion joints, or terminating them at fixtures instead of continuing them through the tile field, concentrates stress and produces cracks.
Movement joints should be sized and located per industry recommendations and must be filled with flexible sealant, not rigid grout. Pay particular attention where tile meets walls, large open areas, and transitions to other flooring types.
A common installation shortcut is to rely on grout joints for movement, grout is rigid and will crack rather than absorb expansion. Proper design and joint placement prevent many recurring cracking problems.
If you find tiles cracking in a regular pattern or at long uninterrupted runs, inadequate movement accommodation is a likely culprit.
Installation And Material-Related Causes
Poor Adhesive Selection Or Application
Adhesive choice matters. Thinset mortars, mastics, and epoxy adhesives all have applications and limitations. Using a water-soluble mastic in a wet area, for instance, invites bond failure and cracking. Similarly, wrong trowel size or poor mortar coverage leaves voids that allow tiles to flex and crack under load.
Full-bedding large-format tiles with the correct mortar and back-buttering techniques ensures consistent support. If mortar isn’t buttered on large tiles, voids form and point loads cause cracking. Ensure you follow adhesive manufacturer coverage and pot-life instructions to avoid cold joints in the mortar bed.
Temperature during installation matters too. Mortars set slower in cold conditions and faster in heat. Installing outside recommended temperature ranges can impair cure and bond strength.
If an adhesive fails, you’ll often see hollow-sounding tiles when tapped. Proper testing and removal of failed sections will reveal whether re-bedding with the right mortar will solve the issue.
Incorrect Tile Selection For The Application
Tiles have ratings for PEI wear, water absorption, strength, and recommended use. Outdoor or freeze–thaw environments require low-absorption porcelain rated for exterior use. Heavy commercial traffic areas need high PEI-rated tiles or specialized quarry tiles. Using the wrong tile for the location invites cracking, spalling, or rapid wear.
For instance, highly glazed, thin tiles placed under heavy furniture or at thresholds will likely crack. Thicker, denser tiles or those with higher modulus of rupture perform better under heavy loads.
Always match tile technical specifications to site conditions. Suppliers can provide test data and ratings to help you make the right choice.
Improper Tile Layout, Cuts, Or Substrate Preparation
Poor layout, such as tiny edge cuts, narrow border strips, or long runs of full tiles without movement joints, can create stress concentrations that crack tiles. Tight edge cuts near walls don’t allow for thermal movement and are classic trouble spots.
Substrate preparation includes leveling, cleaning, priming, and ensuring no contaminants that block adhesive bond. Installing tile over paint, oil, or loose mill-scale will reduce adhesion and lead to failure.
Proper planning, including dry layouts, leaving correct edge spacing, and prepping the substrate, reduces the chance of cracks forming after installation.
Low-Quality Or Defective Tiles And Manufacturing Flaws
Sometimes the tile itself is the problem. Manufacturing defects like internal fissures, improper firing, or nonuniform body composition create weak points that crack under normal loads. Defective batches often reveal themselves as clusters of failures shortly after installation.
When you suspect a production defect, document serial numbers and batch markings and contact the supplier. Reputable manufacturers will inspect and sometimes replace defective shipments.
But, don’t assume all failures are manufacturing defects. Rule out substrate and installation issues first: defects are often found only after other causes are excluded.
Environmental And Moisture-Related Causes
Moisture In The Substrate And Vapor Pressure
Moisture migrating from the substrate creates vapor pressure that can delaminate adhesive or create upward stresses on tiles. In slab-on-grade situations with no vapor barrier, moisture can build and produce tile failure. Testing for moisture content and vapor transmission is a key step before re-tiling.
Vapor remediation may include installing a proper vapor barrier, using vapor-tolerant mortars and membranes, or adding moisture mitigation systems. Ignoring substrate moisture guarantees recurring bond problems and cracking.
Check moisture with a reliable meter and follow manufacturer thresholds for adhesive and grout application. If readings exceed limits, don’t proceed until mitigation is in place.
For reference on moisture and construction guidance, authoritative resources like the U.S. Geological Survey discuss freeze–thaw and moisture effects on materials (https://www.usgs.gov/). Use such sources to understand local environmental stressors.
Freeze–Thaw Cycling And Temperature Extremes
In climates that freeze and thaw, tiles and mortar experience expansion and contraction. If the tile or substrate absorbs water and then freezes, internal stresses can cause cracking or spalling. Exterior tiles and unheated garages are especially vulnerable.
Select frost-resistant porcelain and frost-rated mortars for exterior installations. Provide proper drainage so water doesn’t pool beneath tiles or in joints, and employ movement joints to accommodate thermal changes.
Temperature extremes indoors, such as sun-exposed tiling near large windows, can also create differential heating that stresses tile assemblies. Consider color, material, and movement joints when designing such areas.
Chemical Exposure And Efflorescence
Certain chemicals, including de-icing salts, acids, or cleaners, can damage tile glaze or degrade mortar. Efflorescence, white salt deposits, forms when soluble salts migrate to the surface with moisture and crystallize. Efflorescence itself can indicate moisture movement that may eventually cause bond failure and cracking.
Address chemical exposure by choosing resistant tiles and grout, and by preventing moisture movement. Clean efflorescence with appropriate cleaners but investigate and stop the moisture source to prevent recurrence.
Mechanical And Load-Related Causes
Point Loads, Heavy Furniture, And Impact Damage
Point loads concentrate stress on a small area and are a frequent cause of cracked tiles. Legs from heavy furniture, exercise equipment, or dropped tools can fracture a tile even when the overall installation is sound. Protect vulnerable tiles with furniture pads, reinforced tiles, or specialized underlayments.
For spaces that see heavy equipment, plan for thicker, stronger tile bodies or a structural topping to distribute loads. When remodeling, ask whether you need commercial-grade tile rather than residential-grade products.
Repairing impact damage usually requires tile replacement: temporary cosmetic fixes won’t restore structural capacity.
Vibrations, Nearby Construction, And Dynamic Loads
Vibrations from adjacent construction, heavy traffic, or machinery can fatigue adhesive bonds and cause microcracking that eventually becomes visible. Repeated dynamic loads are more damaging than a single static load of the same magnitude because they induce cyclical stress.
If you’re near a construction site or an industrial operation, consider vibration mitigation and inspect tiles frequently during and after heavy activity.
Traffic Patterns And Abrasive Wear Leading To Failure
High-traffic routes, especially those where heavy objects are dragged or where abrasive grit is common, accelerate wear and crack initiation. Surface wear reduces glaze protection and can expose the tile body to moisture and further damage.
Manage traffic with area rugs, regular cleaning, and choosing tiles rated for the expected traffic level. Preventing abrasive grit from entering a space by adding walk-off mats reduces wear and extends tile life.
How To Inspect And Diagnose Cracked Tiles
Systematic Visual Inspection And Crack Mapping
Begin by mapping cracks across the entire tiled area. Note crack type, orientation, and whether cracks parallel slab joints or room features. Photographs with dated notes help track progression.
Look for patterns: linear cracks following a joint suggest structural movement: random isolated cracks suggest impact or tile defect. Check adjacent walls, ceilings, and doorframes for signs of settlement that correlate with tile cracks.
Keep your inspection systematic: divide the area into zones, inspect each zone under consistent lighting, and record findings. A detailed crack map simplifies diagnosis and communicates issues clearly to contractors.
Probing, Moisture Testing, And Thermography Basics
Tap tiles with a screwdriver handle or use a small hammer to listen for hollow sounds indicating poor bond. Use a moisture meter to test for elevated substrate moisture content and consider infrared thermography to spot voids or delamination that aren’t visible on the surface.
Moisture testing is especially important on slabs without vapor barriers or in spaces where water exposure is possible. Thermography can reveal temperature differentials caused by air gaps under tile.
Combine these methods for a fuller picture: visual mapping, tactile probing, moisture readings, and thermal imaging often point to the true cause.
Determining Whether Cracks Are Active Or Dormant
To tell if cracks are active, mark crack ends with indelible pens and re-measure over days or weeks. Active cracks will widen, lengthen, or new cracks will appear. Dormant cracks stay stable.
Active structural cracks require prompt investigation and likely substrate remediation. Dormant cosmetic cracks can be managed with repair and monitoring.
When To Consult Structural Or Flooring Professionals
If cracks suggest slab settlement, joist deflection, or if you detect active movement, consult structural engineers or experienced flooring professionals. They’ll perform load and deflection tests, core samples, or slab moisture testing and recommend corrective action.
For complex cases, get at least two professional opinions before undertaking major repairs. Proper diagnosis prevents wasted expense and repeat failures.
Repair Options And When To Replace Tiles
Surface Repairs: Fillers, Epoxy, And Cosmetic Fixes
For cosmetic hairline cracks or glaze crazing, surface fillers and colored epoxies can conceal damage effectively. Use flexible fillers for lines near joints so movement doesn’t immediately reopen repairs. Epoxy injections can stabilize small through cracks in place when replacement isn’t feasible.
Surface repairs are cost-effective but should be considered temporary if underlying causes remain. Keep expectations realistic: fillers restore appearance, not necessarily structural performance.
Tile Replacement Techniques And Matching New Tiles
When replacing tiles, remove the damaged tile and surrounding grout carefully, inspect the substrate, and repair any voids before setting a new tile with correct adhesive and bedding techniques. Salvaging tiles from a hidden area for matching is ideal: otherwise, source a close match and accept slight color or shade differences.
For historic or discontinued tiles, consider replacing a whole area or creating an intentional patchwork with matched accent tiles.
Addressing Substrate Problems Before Re-tiling
Never re-tile over a known substrate problem. If the slab has voids, inject grout or repair the slab. If wood joists deflect, reinforce or replace them and install proper underlayment. Address moisture sources and install vapor mitigation where needed.
Correcting the substrate first ensures the new tile installation lasts. Skipping this step is the main reason re-tiling fails.
Temporary Versus Permanent Fixes And Cost Considerations
Decide whether a temporary cosmetic fix is acceptable until a larger renovation or whether permanent corrective work is needed now. Temporary fixes cost less short term but can compound problems. Permanent repairs cost more upfront but lower lifetime expense.
Prepare a cost-benefit table when evaluating options. Here’s a simple comparison to guide decisions:
| Repair Type | Typical Cost Range | Longevity | When to Choose |
|---|---|---|---|
| Surface filler or epoxy | Low | Short term (1–3 years) | Cosmetic fixes or interim solutions |
| Tile replacement only | Moderate | Medium term (5–10 years) | Isolated failures with sound substrate |
| Substrate remediation + re-tile | High | Long term (15+ years) | Active structural issues or recurring failures |
| Structural underpinning or joist repair | High | Long term | Severe settlement or deflection issues |
Weigh immediate budget against long-term value: often fixing the substrate saves money over repeated cosmetic repairs.
Prevention And Best Practices
Choosing The Right Tile And Materials For The Space
Match tile technical specs to the environment. For outdoors or freeze–thaw exposures use vitrified porcelain rated for frost resistance. For commercial floors choose high PEI-rated tiles that handle abrasion and heavy loads. Confirm manufacturer data before purchase.
Buy a little extra tile from the same batch to allow for future replacements, shade variations are common between batches. Keep product sheets and batch numbers on file for warranty or defect claims.
Proper Substrate Preparation And Movement Joint Design
Prepare the substrate to be clean, rigid, and within tolerance for flatness. Install movement joints per recognized standards and align tile joints with slab or structural joints where feasible. Use backer boards, membranes, or uncoupling systems where appropriate to reduce the transfer of minor movements.
Good substrate prep is the single best preventive measure against cracking.
Correct Adhesive, Grout, And Installation Methods
Use adhesives and grouts suited to the tile and site conditions. Full mortar coverage, correct trowel notch, and proper curing time matter. Avoid shortcuts like thin adhesive spots or insufficient curing. Follow tile and adhesive manufacturer installation instructions precisely.
For guidance on best-practice installations, the Tile Council of North America and reputable manufacturers publish detailed installation handbooks that outline correct assemblies and procedures (https://www.tcnatile.com/).
Maintenance Tips To Extend Tile Life
Keep grout and joints well sealed to minimize moisture ingress. Clean salts and chemicals promptly, and place protective pads under heavy furniture. Monitor for minor issues and address them early to prevent escalation.
Simple routine maintenance extends tile life dramatically and reduces the chance you’ll face large, costly repairs later.
Conclusion
Tile cracks are symptoms, not just problems to mask. You’ll prevent most failures by matching tile and adhesive to conditions, preparing rigid substrates, installing appropriate movement joints, and addressing moisture. Diagnose carefully, map cracks, test moisture, and determine whether the issue is active, before choosing cosmetic repairs or full replacement.
When in doubt about slab settlement, joist deflection, or active movement, consult qualified structural and flooring professionals. A targeted fix that addresses the root cause is almost always more economical over time than repeated surface repairs.
If you follow sound material selection, installation protocols, and regular maintenance, your tiled floor should remain functional and attractive for decades. Small preventive steps today save big headaches tomorrow.
Frequently Asked Questions
What are the main floor tiles cracking reasons I should check first?
The most common floor tiles cracking reasons are substrate movement or moisture, poor installation (insufficient mortar coverage or wrong adhesive), improper backer or joist deflection, lack of movement joints, and incorrect tile selection for the environment. Address the root cause before repairing or replacing tiles.
How can I tell if a crack is cosmetic or structural?
Test whether the crack goes through the tile, whether grout or tile planes are displaced, and if the crack changes with loads or temperature. Map and monitor cracks over days or weeks—active widening means structural; stable hairline glaze crazing is usually cosmetic.
What inspection steps reveal floor tiles cracking reasons like moisture or voids?
Do a systematic visual map, probe tiles for hollow sounds, measure substrate moisture with a reliable meter, and consider infrared thermography to find voids. These tests together identify moisture, delamination, or voids that commonly cause tile cracking.
Can underfloor heating cause floor tiles cracking reasons and how do I prevent it?
Yes—improperly designed or rapidly heated underfloor systems can create thermal stress and differential movement that crack tiles. Prevent by using rated tile and adhesives, gradual heat ramps, proper movement joints, and installing uncoupling membranes or flexible thinset formulated for thermal movement.
If I suspect manufacturing defects, are tile suppliers likely to honor warranties and how do I proceed?
Manufacturers often cover batch defects if you document batch numbers, installation date, and rule out substrate/installation causes. Photograph failures, preserve sample tiles, and contact the supplier promptly. Expect inspection; warranties vary, so keep purchase and batch records to improve claim success.