
Your morning routine just turned chaotic. You press the remote, nothing happens, and you realize your garage door opener is dead after last night’s storm.
After a power outage, your LiftMaster garage door opener stops working because of tripped circuit breakers, fried logic boards from power surges, lost remote programming, or disrupted limit settings. Most issues require a simple power reset, breaker check, or reprogramming the remote using the Learn button, while severe cases may involve damaged components that need replacement.
This guide walks you through every troubleshooting step you need to diagnose and fix the problem yourself. You’ll learn how to check power sources, reset your system, reprogram lost remotes, and know exactly when to call for professional help.

Key Takeaways
- A LiftMaster garage door opener not working after a power outage usually stems from tripped circuit breakers, lost remote programming, or disrupted limit settings—most fixable with a simple power reset and Learn button reprogramming.
- Start troubleshooting by checking your home’s electrical panel for a tripped breaker, then perform a hard reset by unplugging the opener for 60 seconds to clear corrupted memory from the power surge.
- Reprogram lost remotes by pressing the Learn button on your motor unit, then pressing your remote button within 30 seconds until the opener lights blink twice to confirm pairing.
- Inspect and clean safety sensors on both sides of the door frame, as misaligned photo-eyes or dirty lenses prevent the door from closing even when the motor works correctly.
- Use the red emergency release cord to manually operate your door if needed, but avoid repeated manual use as it stresses components designed for motorized movement.
- Prevent future outages from disabling your opener by installing a surge protector rated for at least 2,000 joules or upgrading to a LiftMaster model with built-in surge protection and battery backup.
Common Power Outage Impacts
Power Surges and Circuit Issues
Power surges during a storm can trip your circuit breaker or even fry the logic board inside your LiftMaster unit. When electricity returns after a blackout, the sudden voltage spike overwhelms sensitive electronics. Your opener might show no lights, make no sound, or display erratic blinking patterns that indicate internal damage.
Check your main electrical panel first. A tripped breaker appears in a middle position between ON and OFF, or it sits fully in the OFF position. Flip it completely off, then back on to restore power. If the breaker trips again immediately, you likely have a short circuit or a damaged transformer inside the opener itself.
Some LiftMaster models include a built-in surge protection feature, but older units from before 2015 are especially vulnerable. If you smell burning plastic or see scorch marks near the motor housing, stop using the unit and unplug it. A fried logic board typically costs $80-150 to replace, though calling a technician adds labor fees.
Loss of Remote or Keypad Synchronization
Power outages don’t usually erase remote programming, but they can. If your wall button works but your handheld remote or wireless keypad doesn’t respond, the radio frequency sync was lost when the system rebooted. You’ll need to reprogram each device using the Learn button on your overhead motor unit.
LiftMaster units have either a yellow, purple, or orange Learn button located on the back or side panel of the motor housing. Press and release that button, then within 30 seconds press and hold the button on your remote until the opener lights blink or you hear two clicks. Repeat for each remote and keypad.
“After the storm, none of my remotes worked. I thought the whole system was dead, but reprogramming with the purple Learn button fixed everything in under two minutes.” via Garage Door Forum
If the Learn button doesn’t light up when you press it, your motor unit isn’t receiving power. Go back and verify the breaker and outlet are functioning.
Disrupted Limit Settings and Safety Sensors
Your LiftMaster uses limit switches to tell the motor exactly when to stop opening and closing. A power surge can reset these settings, causing the door to reverse unexpectedly, stop halfway, or refuse to close completely. You’ll hear the motor engage, but the door won’t move through its full range.
Safety sensors mounted on either side of the door frame also lose alignment during power fluctuations. These infrared photo-eyes must face each other perfectly. If the LED on one sensor is off or blinking, the system assumes something is blocking the doorway and won’t close. Wipe the lenses with a clean cloth and check that both mounting brackets are tight and level.
Some homeowners report their door opens fine but won’t close after a blackout. This almost always points to misaligned sensors or a limit setting that needs adjustment. Consult your owner’s manual for the specific limit adjustment screws on your model, usually found on the side panel of the motor unit.
Component Failure and Wiring Problems
Severe storms can damage more than just the logic board. The transformer that steps down household voltage to the low-voltage circuits for your wall button and sensors can burn out. If your wall button is completely dead and shows no lights, test the transformer with a multimeter or check for loose wiring at the terminal screws.
Internal capacitors, motor windings, and relay switches can also fail from voltage spikes. A clicking sound without any motor movement suggests a bad capacitor. A humming noise with no action indicates a seized motor or failed start relay. These repairs require disassembly and component-level diagnosis, best left to a trained technician.
For persistent wiring issues, consider upgrading to a surge protector power strip designed for appliances. This Amazon option offers 4,000 joules of protection and can prevent future logic board failures.

Step-by-Step Recovery Process
Checking Power Supply and Breakers
Start at your home’s electrical panel. Locate the breaker labeled “Garage” or “Garage Door Opener” and verify it’s in the ON position. If it’s tripped, reset it by switching it fully off, then back on. Listen for a click when the motor unit powers up.
Next, check the outlet where your opener plugs in. Unplug the unit, plug in a lamp or phone charger to confirm the outlet works, then reconnect the opener. Some models have a power switch on the motor housing itself, make sure it’s in the ON position.
If the opener still shows no lights or sounds, unplug it for 60 seconds to perform a hard reset. This clears any corrupted memory from the power surge. Plug it back in and watch for the diagnostic LED to illuminate. A steady light means the unit is receiving power and ready to operate.
Using the Manual Release Cord for Manual Operation
If your opener won’t respond but you need to get your car out immediately, locate the red emergency release cord hanging from the center rail. Pull down and back toward the door to disengage the carriage from the chain or belt drive. You’ll hear a click as the trolley releases.
Now you can lift the door manually. It should feel balanced and move smoothly. If it’s extremely heavy or won’t stay open halfway, your springs are damaged, don’t attempt repeated manual use.
Once the door is open, leave the release cord disengaged until you restore power to the opener. Trying to operate the motor while the carriage is disconnected can damage the drive system.
Resetting the Opener and Reprogramming Controls
After restoring power, clear any error codes by pressing and holding the wall button for 10 seconds. The LED will blink, signaling a system reset. Now reprogram your remotes and keypad using the Learn button method described earlier.
For remotes, press the Learn button on the motor unit, then press the button on your remote within 30 seconds. The opener lights will blink twice to confirm the pairing. For keypads, enter your PIN followed by the PROGRAM button, then press Learn on the motor unit.
If you have a MyQ Wi-Fi hub or built-in smart features, you may need to reconnect to your home network. Open the MyQ app, delete the old device, and re-add it using the serial number on the motor unit. This process takes about five minutes and requires your Wi-Fi password.
Inspecting Sensors and Testing Safety Features
Walk to the bottom of your door frame and inspect both safety sensors. Each sensor has a small LED: one should glow solid green or amber, the other should match. If either is blinking or off, adjust the bracket until both lights are steady.
Test the auto-reverse by placing a 2×4 piece of wood flat on the floor under the door path. Close the door using the wall button. When it contacts the wood, it should immediately reverse and open fully. If it doesn’t, your force settings need adjustment or the sensors remain misaligned.
Check the photo-eye lenses for dirt, spider webs, or water spots. Even a small smudge blocks the infrared beam and prevents closing. Clean with a soft cloth and test again. Also verify that no direct sunlight hits the sensors, bright light can overwhelm the receivers and cause false obstruction signals.
Safe Operation and Reconnection
Proper Use of Red Emergency Release Cord
The emergency release cord is your lifeline when power fails, but improper use can injure you or damage the door. Always pull the cord when the door is fully closed. If you pull it while the door is open and your springs are broken, the door can slam down violently.
Pull straight down, then back toward the door at a 45-degree angle. This motion slides the trolley carriage away from the chain or belt drive. You’ll feel resistance, then a release. Don’t yank or jerk, smooth, firm pressure works best.
Once disengaged, test the door balance by lifting it halfway. It should stay in place without support. If it drops or shoots up, your torsion springs are failing and manual operation becomes unsafe. In this case, leave the door closed and call a professional before attempting further use.
Re-Engaging the Door to Automatic Operation
After you’ve restored power and confirmed the opener works, you need to reconnect the trolley to the carriage. Close the door manually until it’s fully down and sealed. Press the wall button or remote, the motor will run and the trolley will move along the rail until it reconnects with the carriage automatically.
You’ll hear a click or clunk as the two pieces snap together. The door should then open normally. If the motor runs but the door doesn’t move, the trolley didn’t reconnect. Pull the release cord again, make sure the door is completely closed, and try once more.
Some LiftMaster models require you to pull the release handle toward the motor to manually re-engage the carriage. Check your owner’s manual if the automatic method doesn’t work after three attempts.
Avoiding Damage During Manual Use
Manual operation puts stress on components designed for motorized movement. Don’t slam the door shut or drop it from the open position. Lower it smoothly, supporting the weight as it descends. Repeated rough handling can bend the horizontal tracks or damage the rollers.
Never leave the door partially open without blocking it in place. A door with weak springs can fall unexpectedly, crushing anything underneath. Use a sturdy object like a step ladder or concrete block to prop it open if needed.
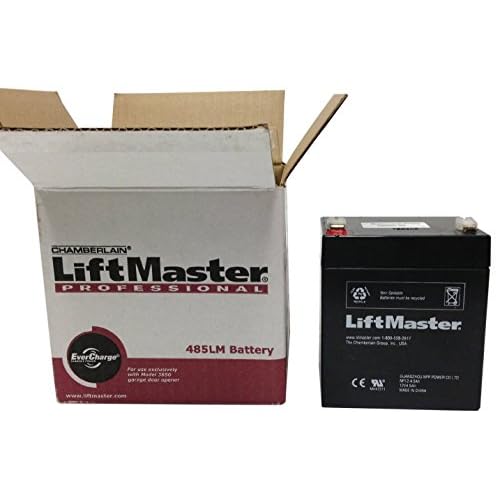
If you must operate manually for more than a day, consider investing in a LiftMaster battery backup system. This Amazon product keeps your opener running during extended outages and eliminates the need for manual operation entirely.
Preventive Measures and Professional Help
Installing Surge Protectors and Battery Backups
A quality surge protector is your first line of defense. Choose one rated for at least 2,000 joules and include equipment insurance. Plug your opener into the surge protector, not directly into the outlet. This absorbs voltage spikes before they reach the sensitive logic board.
Battery backup systems keep your opener running when the power goes out. LiftMaster offers models with built-in battery backup that automatically kick in during outages. These systems cost $200-400 but save you from ever being locked out again. They also prevent the need to manually operate the door during storms.
Some homeowners install whole-house surge protection at the electrical panel. This option costs $300-600 installed but protects every appliance in your home, not just the garage door opener. Consult a licensed electrician to determine if your panel supports this upgrade.
Regular Maintenance and Inspection
Prevent outage-related problems with quarterly maintenance. Test your remote batteries, clean the safety sensors, and inspect all visible wiring for fraying or corrosion. Lubricate the chain or belt drive with white lithium grease to reduce motor strain.
Check the manual disconnect and emergency release cord every few months. Pull it to verify it operates smoothly, then re-engage the carriage. This ensures you won’t struggle with a stuck release during an actual emergency.
Schedule an annual professional inspection if your opener is more than ten years old. Technicians can spot failing capacitors, worn gears, and weak springs before they leave you stranded. According to the International Door Association, regular maintenance extends opener lifespan by 40% and prevents 70% of emergency service calls.
Calling a Garage Door Technician for Complex Issues
Some problems exceed DIY repair. If you’ve reset the breaker, reprogrammed remotes, and checked sensors but the opener still won’t work, the logic board or transformer likely failed. Component-level repairs require specialized tools and knowledge of low-voltage circuits.
Call a professional if you smell burning plastic, see sparks, or hear grinding noises from the motor. These signs indicate serious electrical or mechanical damage that can worsen if you continue using the system. Most technicians charge $75-150 for a diagnostic visit and provide a repair estimate.
“I spent two hours troubleshooting after a lightning strike. The tech showed up, tested the logic board with a multimeter, and had a new one installed in 20 minutes. Sometimes you just need the right tools and experience.” via r/HomeImprovement
For persistent issues or homes with frequent power fluctuations, consider upgrading to a newer LiftMaster model with built-in surge protection and battery backup. Modern units also feature Wi-Fi connectivity and smartphone alerts, giving you real-time status updates even when you’re away from home.
Frequently Asked Questions
Why is my LiftMaster garage door opener not working after a power outage?
Your LiftMaster garage door opener may not work after a power outage due to tripped circuit breakers, a fried logic board from power surges, lost remote programming, or disrupted limit settings. Start by checking your electrical panel breaker and resetting it if tripped, then reprogram your remotes using the Learn button on the motor unit.
How do I reprogram my garage door remote after a power outage?
Locate the Learn button (yellow, purple, or orange) on your LiftMaster motor unit. Press and release it, then within 30 seconds press and hold your remote button until the opener lights blink or you hear two clicks. Repeat for each remote and keypad to restore synchronization.
What should I do if my garage door won’t close after a power outage?
If your door won’t close, check your safety sensors for misalignment or dirt. The infrared photo-eyes on both sides must face each other perfectly and have steady LED lights. Wipe the lenses clean and adjust the brackets until both LEDs glow steady. Misaligned sensors are the most common cause.
Can I manually open my garage door if the opener is broken?
Yes, pull the red emergency release cord downward and back toward the door at a 45-degree angle to disengage the carriage. You can then lift the door manually. However, if the door feels extremely heavy or won’t stay open, your springs may be damaged—stop and call a professional.
How much does it cost to replace a LiftMaster logic board?
A fried logic board typically costs $80–150 for the part alone. Labor fees from a technician add $75–150 for a diagnostic visit and repair. Installing surge protection ($200–400) can prevent costly logic board failures from future power surges.
What is the best way to protect my garage door opener from power outages?
Install a surge protector power strip rated for at least 2,000 joules and plug your opener into it. Consider a LiftMaster battery backup system ($200–400) to keep your opener running during outages. For whole-home protection, a surge protector at your electrical panel costs $300–600 installed.
Read More:
- LiftMaster Garage Door Opener Not Working (Here’s the 5 Quick Fixes)
- LiftMaster Garage Door Sensors Not Working? Quick 5-Minute Fix Guide
- LiftMaster Garage Door Opener Light Not Working (Here’s How to Fix It Fast)
- LiftMaster Garage Door Opener Control Panel Not Working? Fix It Fast
- LiftMaster Garage Door Opener Wall Control Not Working (Quick Fixes)